Showing posts with label itunes. Show all posts
Showing posts with label itunes. Show all posts
Tuesday, October 15, 2013
Apple Releases iTunes 10 5 1 Launches iTunes Match In The U S
Apple has just released iTunes 10.5.1. Though it doesnt seem to be available via Software updates, when you click on the Free download link on the iTunes page, it takes you to the download page where iTunes 10.5.1 is available for download. Based on iTunes 10.5.1 beta that was seeded to developers, it includes a number of performance and stability improvements for iTunes Match - one of the major features of iCloud. iTunes 10.5 that was released last month included the following new features:
- iTunes in the Cloud. iTunes now stores your music and TV purchases in iCloud and makes them available on your devices anywhere, any time, at no additional cost.
- Automatic Downloads. Purchase music from any device or computer and automatically download a copy to your Mac and iOS devices.
- Download Previous Purchases. Download your past music, TV, app, and book purchases again, at no additional cost. Previous purchases may be unavailable if they are no longer on the iTunes Store.
- Sync with your iPhone, iPad, or iPod touch with iOS 5.
- Wi-Fi Syncing. Automatically sync your iPhone, iPad, or iPod touch with iTunes any time they’re both on the same Wi-Fi network.

You need to go to the iTunes download page (this link) to download iTunes 10.5.1.
Update: It looks like Apple has also launched iTunes Match service in the U.S.iTunes Match is a new service that Apple had unveiled along with iOS 5 and iCloud at the WWDC 2011 Keynote address in June. It allows users to store their entire music collection (up to 25,000 songs), including songs that theyve ripped from CDs or purchased from anywhere else in iCloud. Heres how it works: iTunes determines which songs in your collection are available in the iTunes Store. Any music with a match is automatically added to your iCloud library for you to listen to anytime, on any device. Since there are more than 18 million songs in the iTunes Store, most of your music is probably already in iCloud. All you have to upload is what iTunes can’t match. Which is much faster than starting from scratch. And all the music iTunes matches plays back at 256-Kbps iTunes Plus quality — even if your original copy was of lower quality. It costs $24.99 per year. iTunes Match will initially available only in the U.S. and expected to be available in other countries sometime later. Apple was initially expected to launch iTunes Match service along with the launch of iCloud and iOS 5, but has delayed it to fix the outstanding bugs.
==================
Apple Releases iTune 10.5.1 With iTunes Match to the Public

Apple has officially released iTunes 10.5.1 to the public following several developer betas. iTunes Match has been in the final testing stages for months, and beta 3 of the cloud music service was seeded to developers over the weekend.
Alongside iTunes 10.5.1, Apple is finally releasing iTunes Match to the US public today after a two week delay. It’s finally here…
The new iTunes is also available on Apple’s website, and the 10.5.1 is propagating in Software Update for Mac and Windows users. iTunes 10.5.1 is required to use iTunes Match, and iOS 5 users will be able to access their tracks in the cloud once the service is enabled in iTunes

Neither iTunes 10.5.1 nor iTunes Match seem to be available for everyone yet, as Apple is still rolling things out. If you can’t get the new iTunes in Software Update, we recommend downloading it directly from Apple’s website.
iTunes Match is still a US-only service.
More screenshots:


Apple also confirmed the availability of iTunes Match in the U.S., with the following announcement on their iTunes page. iTunes Match syncs users’ music to iCloud for $24.99 a year. Unlimited songs can be synced and doesn’t affect iCloud storage, but only songs that are available on iTunes can be synced.
Even though it is available to the public, Apple is still labeling iTunes Match as a beta product. Developers who tested Match will still receive a free three months with a year subscription.

Monday, October 7, 2013
Fix iTunes 3194 error when downgrading 5 0 1 to 4 3 3 4 3 5 using TinyUmbrella
How to fix iTunes 3194 error when downgrading from 5.0.1 to 4.3.3 / 4.3.5 or what ever iOS version? We will show you how tweak Hosts file in order to bypass iTunes 3194 when downgrading iPhone? Here is a 2 step guide that is going to help you do this!

For Windows:
Step 1 : Open Notepad or any text editing tool. After that , launch windows explorer or press Windows + E , navigate to C:WindowsSystem32driversetc and then in ETC directory open the HOSTS file with Notepad.
Step 2 : Add "74.208.10.249 gs.apple.com" at the last of HOSTS file and then save it.
For Mac :
Step 1 : Open Go -> Go to Folder and then enter path/etc
Step 2 : Launch HOSTS file via TextEdit or any text editing tools and add "74.208.10.249 gs.apple.com" at the last of the file
Then follow this guide to downgrade your iPhone from iOS 5.0.1 using TinyUmbrella. Note that some iPhone jailbreakers who downgrade their devices from iOS 5 back to a lower version experience "No service issue". It is recommended to restore the iPhone back to iOS 5 if this error shows and then jailbreak it using RedsnOw 0.9.9b8 as theres a no fix for this error at the moment.
For Windows:
Step 1 : Open Notepad or any text editing tool. After that , launch windows explorer or press Windows + E , navigate to C:WindowsSystem32driversetc and then in ETC directory open the HOSTS file with Notepad.
Step 2 : Add "74.208.10.249 gs.apple.com" at the last of HOSTS file and then save it.
For Mac :
Step 1 : Open Go -> Go to Folder and then enter path/etc
Step 2 : Launch HOSTS file via TextEdit or any text editing tools and add "74.208.10.249 gs.apple.com" at the last of the file
Then follow this guide to downgrade your iPhone from iOS 5.0.1 using TinyUmbrella. Note that some iPhone jailbreakers who downgrade their devices from iOS 5 back to a lower version experience "No service issue". It is recommended to restore the iPhone back to iOS 5 if this error shows and then jailbreak it using RedsnOw 0.9.9b8 as theres a no fix for this error at the moment.
Fix iTunes Error 3001 42110 5103 When Downloading Movie
When you try to download movie rental from the iTunes Store you may experience an error message 3001, 42110, or 5103 .We will try to give you the trusted solution to these errors . We wish that would help all iOS devices users when experiencing these errors.
For Mac OS X :
1-Quit iTunes and any other open applications so only the Finder is open.
2-Click Go > Go to Folder.
3-Type /Users/Shared/SC Info and click Go.
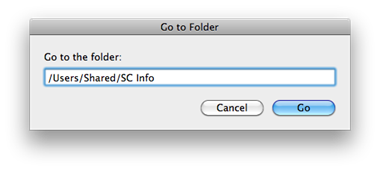
4-If Finder is not set to column view you can set it by choosing View > as Columns.
5-Select the SC Info folder and move it to the Trash by choosing File > Move to Trash.
6-Open iTunes and choose Store > Check for available downloads.
7-After your rental finishes downloading, choose Store > Authorize.
8-Enter your account name and password, then click the Authorize button.
For windows xp :
1-Open My Computer from the desktop or Start Menu.
2-From the Tools menu, choose Folder Options
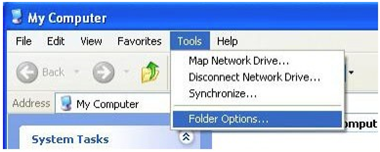
3-Click View tab.
4-In the "Advanced settings" pane under "Hidden files and folders," make sure that the "Show hidden files and folders" option is selected.
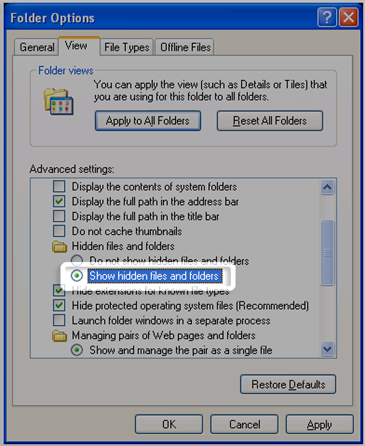
5-Click OK.
6-Navigate to the following location by either typing it into the address bar, copying and pasting it into the address bar, or clicking through the folder hierarchy listed:
C:Documents and SettingsAll UsersApplication DataApple ComputeriTunes
7-Right-click the SC Info folder shown and on the shortcut menu, choose Delete.
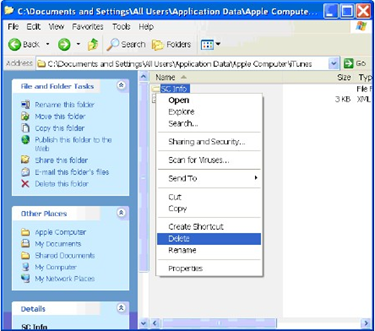
8-Restart the computer.
9-Open iTunes and choose Store > Check for available downloads.
10-After your rental finishes downloading, choose Store > Authorize.
11-Enter your account name and password, then click the Authorize button.
For windows 7 & vista :
1-From the Start menu, choose Computer.
2-From the Organize menu, choose Folder and Search Options.
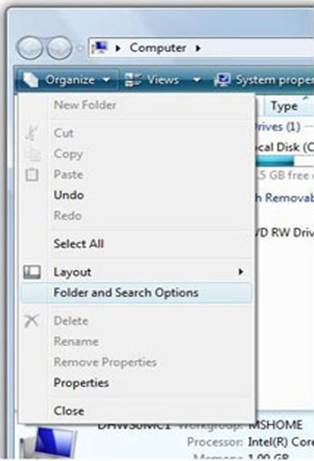
3-Click View tab.
4-In the "Advanced settings" pane under "Hidden files and folders," make sure that the "Show hidden files and folders" option is selected.
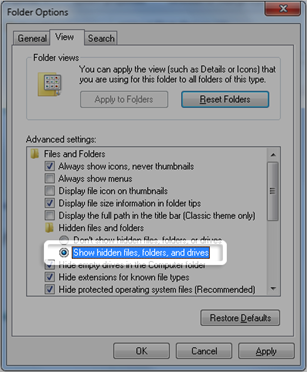
5-Click OK.
6-Navigate to the following location by either typing it into the address bar, copying and pasting it into the address bar, or clicking through the folder hierarchy listed:
C:Documents and SettingsAll UsersApplication DataApple ComputeriTunes
7-Right-click the SC Info folder shown and on the shortcut menu, choose Delete.
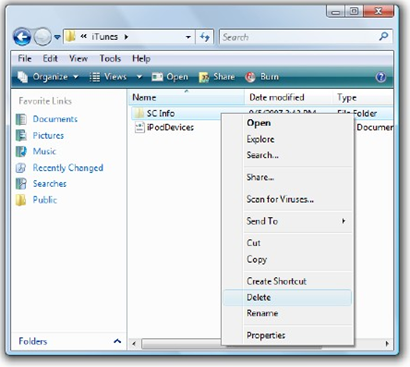
8-Restart the computer.
9-Open iTunes and choose Store > Check for available downloads.
10-After your rental finishes downloading, choose Store > Authorize.
11-Enter your account name and password, then click the Authorize button.
How Fix iTunes Error 3001, 42110, 5103 :
If you have the most recent version and are still unable to download your rental, you may be able to resolve your issue by removing the "SC Info" folder. To do so, follow these steps:For Mac OS X :
1-Quit iTunes and any other open applications so only the Finder is open.
2-Click Go > Go to Folder.
3-Type /Users/Shared/SC Info and click Go.

4-If Finder is not set to column view you can set it by choosing View > as Columns.
5-Select the SC Info folder and move it to the Trash by choosing File > Move to Trash.
6-Open iTunes and choose Store > Check for available downloads.
7-After your rental finishes downloading, choose Store > Authorize.
8-Enter your account name and password, then click the Authorize button.
For windows xp :
1-Open My Computer from the desktop or Start Menu.
2-From the Tools menu, choose Folder Options

3-Click View tab.
4-In the "Advanced settings" pane under "Hidden files and folders," make sure that the "Show hidden files and folders" option is selected.

5-Click OK.
6-Navigate to the following location by either typing it into the address bar, copying and pasting it into the address bar, or clicking through the folder hierarchy listed:
C:Documents and SettingsAll UsersApplication DataApple ComputeriTunes
7-Right-click the SC Info folder shown and on the shortcut menu, choose Delete.

8-Restart the computer.
9-Open iTunes and choose Store > Check for available downloads.
10-After your rental finishes downloading, choose Store > Authorize.
11-Enter your account name and password, then click the Authorize button.
For windows 7 & vista :
1-From the Start menu, choose Computer.
2-From the Organize menu, choose Folder and Search Options.

3-Click View tab.
4-In the "Advanced settings" pane under "Hidden files and folders," make sure that the "Show hidden files and folders" option is selected.

5-Click OK.
6-Navigate to the following location by either typing it into the address bar, copying and pasting it into the address bar, or clicking through the folder hierarchy listed:
C:Documents and SettingsAll UsersApplication DataApple ComputeriTunes
7-Right-click the SC Info folder shown and on the shortcut menu, choose Delete.

8-Restart the computer.
9-Open iTunes and choose Store > Check for available downloads.
10-After your rental finishes downloading, choose Store > Authorize.
11-Enter your account name and password, then click the Authorize button.
Thursday, September 26, 2013
What do these new items in iTunes mean about your Match Library
If you don’t know by now, Apple has officially opened up their iTunes Match service to the public, bringing with it 256-kbps AAC DRM-free copies of your non-iTunes purchased music for $25 a year. To help familiarize users with the service, Apple has posted the following chart walking us through some new iTunes Match related iCloud icons you’ll start to notice in iTunes.
In the troubleshooting guide, we learn you can enable a column within iTunes to display the iTunes Match/iCloud status of any given song in your library. For example, whether it’s a “Matched” song or just “Uploaded”. To do this, click “View > View Options” or press “Command-J“, and click the “iCloud Status” checkbox (same place you also enable “iCloud download”).
A MacRumors forum poster also offers a few helpful hints, while noting iTunes Match keeps your meta-data (a nice touch if you tend to edit data associated with your songs), the post clears up some concerns regarding the intricacies of what happens with your local copies: If you need yet more clarification regarding DRM and which songs are eligible for iTunes Match, Apple breaks down the main things you need to know:As for iTunes Match supported file formats, Apple explains:
- iTunes Match is currently available only in the United States. Songs purchased outside of the United States iTunes Store containing DRM will not be matched or uploaded to iCloud.
- If a song contains DRM and is no longer available on the iTunes Store for purchase, the song is uploaded to iCloud and made available for download in protected DRM format. You will be required to authorize your computer or device for playback.
- A song will not be uploaded to iCloud if the song contains DRM, was purchased using a different Apple ID, and could not be matched.
- When you subscribe to or enable iTunes Match, your iOS device or computer will be associated to the Apple ID being used for iTunes Match.
- Songs encoded as MP3 or AAC that have been matched to the iTunes Store will be made available for download as 256 kbps as AAC from iCloud.
- Songs encoded as MP3 or AAC that cannot be matched to the iTunes Store will be uploaded as is. These songs will be made available for download in the same format it was uploaded in.
- Songs encoded as MP3 or AAC with a bitrate of 96 kbps or less will not be matched or uploaded to iCloud.
- Songs encoded as ALAC, WAV, or AIFF, will be transcoded in iTunes to 256 kbps AAC when uploaded to iCloud.
- Song files over 200 MB will not be uploaded to iCloud.


Tuesday, September 24, 2013
Fix iTunes Error 21 when restore Custom IPSW iPhone iPod Touch iPad
How to Fix iTunes error 21 ? Well, error 21 is happening with users who are trying to jailbreak their iPhone 4, 3GS, iPod touch 4G, 3G or iPad using custom ipsw (per-jailbroken ipsw firmware) with PwnageTool or sn0wbreeze which are the only jailbreak tools that make custom ipsw.
What does iTunes error 21 mean ?
When you found iTunes error 21, it means that you are attempting to restore custom ipsw in the recovery mode.
How to Fix iTunes error 21 ?
To fix iTunes error 21 on iPhone 4, 3GS, iPod Touch 4G, 3G or iPad you have to restore to custom ipsw when your device in the DFU mode (Device Firmware Upgrade).
Steps to put your device in DFU mode to Fix iTunes error 21:
Step 1: Connect your iPhone to your Mac/PC and press power button for few seconds. You will be asked to slide to power off. Slick it to power off your iPhone.
Step 2: Now Press and hold Home button and the Sleep/Wake button at the same time.
Step 3: After 10 seconds release the Sleep/Wake button but keep holding the home button until iTunes pops up with a message telling you that it has detected an iPhone in recovery mode.Step 4: Once you are in DFU mode you wont see anything on you screen. It will be BLACK.
Now you have fixed iTunes error 21, go now and restore to custom ipsw firmware without errors


Saturday, September 14, 2013
Apple Released iTunes 10 2 2 with Bug Fixes
Apple has just released iTunes 10.2.2 for both Mac OS X and Windows. iTunes 10.2.2 brings a lot of bug fixes and improvement. check out the full changelog after the jump.Download iTunes 10.2.2 for Mac and Windows.
- Addresses an issue where iTunes may become unresponsive when syncing an iPad.
- Resolves an issue which may cause syncing photos with iPhone, iPad, or iPod touch to take longer than necessary.
- Fixes a problem where video previews on the iTunes Store may skip while playing.
- Addresses other issues that improve stability and performance.

Thursday, September 12, 2013
Download iTunes 10 5 1 Beta 2 Windows Mac
Along with iOS 5.0.1, Apple has also released iTunes 10.5.1 beta 2 for developers to continue iTunes Match beta for developers living in the U.S.

iTunes 10.5.1 release notes follow as:
iTunes 10.5.1 beta 2 with iTunes Match (Windows)
iTunes 10.5.1 beta 2 with iTunes Match (Windows 64)
iTunes 10.5.1 release notes follow as:
iTunes 10.5.1 beta 2 includes a number of important stability and performance improvements for iTunes Match, and is a required update for all subscribers to iTunes Match beta. iTunesMatch is now also available on your Apple TV.
Your iCloud libraries will be deleted at the end of this beta.
Backup regularly and do not delete the music you add to iCloud from your computer. Apple may periodically delete all iCloud libraries during the beta period. This will require you to scan, match, and upload songs again.
About Subscribing
iTunes Match beta is available to iOS developers in the United States.
iTunes Match beta is available as an automatically renewing subscription for $24.99 per year. You may cancel at any time from your Account settings.
You can subscribe to iTunes Match using iTunes 10.5.1 beta 2 on your Mac or PC. You cannot subscribe to iTunes Match from your iOS device or Apple TV.
You can access your music in iCloud on your iPhone, iPad, iPod touch with iOS 5, or your other computers with iTunes 10.5.1 beta 2.
You can access your music in iCloud on your Apple TV with builds 4.4, 4.4.1, or 4.4.2.
Once subscribed, you can add up to 25,000 songs to iCloud, and your iTunes purchases do not count against this limit. iTunes Match will not add your apps, books, movies, TV shows, ringtones, and audiobooks to iCloud. These items can continue to be synced to your iOS device with iTunes. iTunes LPs and iTunes Extras are also unsupported.
iTunes Match includes limits to how you may access your music in iCloud:
You can use iTunes Match on up to 10 computers and iOS devices, up to five of which can be computers authorized with your Apple ID.
You can use iTunes Match simultaneously on 2 Apple TVs.
You can only associate computers and devices with a different Apple ID once every 90 days.
Getting Started
To subscribe to iTunes Match:
Install iTunes 10.5.1 beta 2 on your Mac or PC.
Open iTunes and choose Turn On iTunes Match from the Store menu.
Click the Subscribe for $24.99 button and follow the onscreen instructions. Once complete, your Music library will include songs on your computer and in iCloud.
Once iTunes has completed matching your music with songs on the iTunes Store, you may begin accessing your music in iCloud from your other devices:
From your iOS device:iTunes 10.5.1 beta 2 with iTunes Match (Mac)
Tap Settings > Music > turn iTunes Match ON. This will disable syncing music with iTunes.
Press the Home button and tap Music.
From your other computers:
Install iTunes 10.5.1 beta 2 on your other Macs or PCs.
Open iTunes and choose Store > Sign In. Sign in using the same Apple ID you used to subscribe to iTunes Match.
Choose Store > Turn On iTunes Match.
Click the Add This Computer button.
Once complete, your Music library will include songs on your computer and in iCloud.
From your Apple TV:
Install Apple TV 4.4, 4.4.1, or 4.4.2.
Sign in to the iTunes Store on your Apple TV using the same Apple ID you used to subscribe to iTunes Match.
On your Apple TV tap Music > turn on iTunes Match.
Once complete, you will be able to play songs in iCloud on your Apple TV.
iTunes 10.5.1 beta 2 with iTunes Match (Windows)
iTunes 10.5.1 beta 2 with iTunes Match (Windows 64)
Saturday, September 7, 2013
Fix iTunes Error 1603 When Restoring iPhone in iTunes
Want to Fix iTunes Error 1603 ? Well, you may see this iTunes error 1603 when you trying to restore your iPhone in iTunes. Error 1603 gives you the following error message "The iPhone could not be restored. An unknown error occurred. Error 1603". Lets check how to fix iTunes error 1603 after the jump.
How to fix iTunes error 1603 :
Below I will show you some tips that help you to fix iTunes error 1603 :
Tip 1: Check for iTunes updates :Tip 2: Restart your Computer
- Windows: Choose Help > Check for Updates.
- Mac: Choose iTunes > Check for Updates.
- Restart your computer may help to fix iTunes error 1603
Tip 3: Try different USP PortTip 4: Restart Apple Mobile Device Service (Windows Only) :
- Try to connect your iPhone with computer via another USB port, then try to restore using iTunes.
Restoring Apple mobile device service on Windows XP or Windows Vista / 7 may help you to fix iTunes error 1603 while restoring your iPhone.
Windows XPWindows Vista
- Close iTunes and disconnect iPhone.
- Choose Start > Control Panel.
- Inside the Control Panel, open Administrative Tools.
- Open Services.
- Select Apple Mobile Device and click Stop the service as shown below:
- After the service is stopped, click Start the service.
- After the Apple Mobile Device service has started again, open iTunes and connect iPhone.
- Select iPhone in the Source list, click the Summary tab, and then click Restore.
Tip 5: Reset the iPhone sync history and restore on Windows and Mac - How to do this ?
- Close iTunes and disconnect iPhone.
- Click the Windows Start button
- In the Start Search field type "Services."
- In the Programs section of the search results, Click "Services".
- Select Apple Mobile Device and click Stop the service as shown below:
- After the service is stopped, click Start the service.
- After the Apple Mobile Device service has started again, open iTunes and connect iPhone.
- Select iPhone in the Source list, click the Summary tab, and then click Restore.
WindowsMac
- Open iTunes
- On the Edit menu, click Preferences.
- Click the iPhone tab.
- Click the Reset Sync History button.
Tip 6: Create a new user account - How to do this ?
- Open iSync.
- Choose iSync > Preferences.
- Click the Reset Sync History button.
Windows Vista and Windows XPMac OS X
- From the Start menu, choose Control Panel.
- Open User Accounts.
- Select Create a new account and follow the instructions to complete the account setup process.
- Once the new account is created, choose Log Off from the Start menu.
- Log in to the newly created user account.
If you the above tips didnt work with you and fixed iTunes error 1603 you have to download iReb - Click Here - as it will help you to bypass iTunes error 1603.
- Choose Apple menu > System Preferences.
- Choose View > Accounts.
- Click the "+" (you may need to authenticate to be able to click this).
- Give the new user a name and short name and enter a password.
- Select the checkbox for "Allow user to administer this computer". This makes the user an administrator user.
- Click Create Account.


Subscribe to:
Posts (Atom)