Showing posts with label the. Show all posts
Showing posts with label the. Show all posts
Tuesday, March 18, 2014
Easter Fonts! Fonts on the First!
Since Ive run out of tips for my weekly feature, "Technology Tips Thursday," Ive decided to start a new regular feature on my blog... "Fonts on the First!"
Stop by my blog on the first of every month for a collection of seasonal fonts... 5 which are meant for personal use, and 5 for commercial use! The first collection is Easter Fonts!

Personal Use
KG Hippity Hop
JI Bunny Caps
Bizzy Bunny
RM Egg
Hasi
Commercial Use
Easter Sunrise
Easter Egg
Bunnywunny
Funny Bunny
ADFB Easter Egg
Be sure to stop by the first of next month to see more seasonal fonts!


Read more...
Stop by my blog on the first of every month for a collection of seasonal fonts... 5 which are meant for personal use, and 5 for commercial use! The first collection is Easter Fonts!

Download each of these fonts here:
Personal Use
KG Hippity Hop
JI Bunny Caps
Bizzy Bunny
RM Egg
Hasi
Commercial Use
Easter Sunrise
Easter Egg
Bunnywunny
Funny Bunny
ADFB Easter Egg
Be sure to stop by the first of next month to see more seasonal fonts!
For information on how to install these fonts, check out my step by step tutorial here:
For information on how to spruce up these fonts in PowerPoint, check out this post:

Monday, March 10, 2014
Keyboard Shortcut to Align Text on the Left!
Its Thursday again... which means its time for another quick little technology tip for "Technology Tip Thursday!"
Just like the past few tips, this one is for Microsoft Word and PowerPoint, but you should definitely try it in other programs as well... it just might work!

Try it out and let me know how you like it!
Read more...
Just like the past few tips, this one is for Microsoft Word and PowerPoint, but you should definitely try it in other programs as well... it just might work!
Try it out and let me know how you like it!
Sunday, March 9, 2014
Change the Capitalization of Your Text with Ease!
This tip is probably the one I use the most! Do you ever need to change your text to capitalize it? e.g.:from "happy thankgiving!" to "Happy Thanksgiving!" to "HAPPY THANKSGIVING!" Its actually surprisingly easy to do!

Read more...
This tip works the best in Microsoft Word. It will work to some extent in PowerPoint, but instead of doing "Title Case," it will capitalize the words as if they were in a sentence. Its definitely a nice trick if you want to change the way your text is capitalized!
By the way, Happy Thanksgiving!!! I hope everyone has a wonderful day!
Monday, March 3, 2014
How to Load the Full Version of a Website on your iPad Smartphone!
I remember the days when my iPad automatically loaded the full version of a website... then I upgraded to IOS6 and all of a sudden the whole internet thought my iPad was a mobile device... yikes!!!
Unfortunately, theres no magic setting to switch the iPad back to the way it was before the update, but there are lots of ways you can load the full version of a website on your iPad!

Heres the poll for those of you keeping track! And, for those of you who havent been able to vote from your iPad/smartphone, do this tutorial now to load the poll so you can vote for next week! :)

There are three different options that you can use to load the full version of the site... and here they are!


Read more...
Unfortunately, theres no magic setting to switch the iPad back to the way it was before the update, but there are lots of ways you can load the full version of a website on your iPad!
Heres the poll for those of you keeping track! And, for those of you who havent been able to vote from your iPad/smartphone, do this tutorial now to load the poll so you can vote for next week! :)
There are three different options that you can use to load the full version of the site... and here they are!
You can download this tutorial as a PDF by clicking this picture!
Note: This tutorial is hosted on Google Docs. To save it from there, just open the file and click File > Download to save onto your computer!
For next weeks poll, Im going to add another iPad tutorial: how to take a screenshot on your iPad/iPhone... something that was necessary for me to write this weeks tutorial!
Friday, February 28, 2014
How to Quickly Go to the Beginning of Your Document!
This trick is so simple but so handy! If youre working on a document in Word or PowerPoint and you want to jump back to the very first page in your document, this is going to help you do it so quickly!

Wednesday, February 26, 2014
Celebrate the New Year With This Sight Words Game!
Merry Christmas everyone! Ill keep this one short and sweet so that anyone who celebrate can go enjoy the day with your family!
Today is the 5th and final day of my 5 days of giveaways. Thanks to everyone for playing along the past five days! I loved reading all of your guesses for my favorite Christmas book, movie, song, and your guesses for where Im spending today to celebrate!
I thought that for the final giveaway Id share a flash freebie with you! I just love how these centers came out!
Click any of the pictures to head to TPT to grab this freebie for a limited time only!


Merry Christmas and Happy Holidays everyone!!!
Read more...
Today is the 5th and final day of my 5 days of giveaways. Thanks to everyone for playing along the past five days! I loved reading all of your guesses for my favorite Christmas book, movie, song, and your guesses for where Im spending today to celebrate!
I thought that for the final giveaway Id share a flash freebie with you! I just love how these centers came out!
Click any of the pictures to head to TPT to grab this freebie for a limited time only!
Merry Christmas and Happy Holidays everyone!!!
Tuesday, October 15, 2013
Apple Releases iTunes 10 5 1 Launches iTunes Match In The U S
Apple has just released iTunes 10.5.1. Though it doesnt seem to be available via Software updates, when you click on the Free download link on the iTunes page, it takes you to the download page where iTunes 10.5.1 is available for download. Based on iTunes 10.5.1 beta that was seeded to developers, it includes a number of performance and stability improvements for iTunes Match - one of the major features of iCloud. iTunes 10.5 that was released last month included the following new features:
- iTunes in the Cloud. iTunes now stores your music and TV purchases in iCloud and makes them available on your devices anywhere, any time, at no additional cost.
- Automatic Downloads. Purchase music from any device or computer and automatically download a copy to your Mac and iOS devices.
- Download Previous Purchases. Download your past music, TV, app, and book purchases again, at no additional cost. Previous purchases may be unavailable if they are no longer on the iTunes Store.
- Sync with your iPhone, iPad, or iPod touch with iOS 5.
- Wi-Fi Syncing. Automatically sync your iPhone, iPad, or iPod touch with iTunes any time they’re both on the same Wi-Fi network.

You need to go to the iTunes download page (this link) to download iTunes 10.5.1.
Update: It looks like Apple has also launched iTunes Match service in the U.S.iTunes Match is a new service that Apple had unveiled along with iOS 5 and iCloud at the WWDC 2011 Keynote address in June. It allows users to store their entire music collection (up to 25,000 songs), including songs that theyve ripped from CDs or purchased from anywhere else in iCloud. Heres how it works: iTunes determines which songs in your collection are available in the iTunes Store. Any music with a match is automatically added to your iCloud library for you to listen to anytime, on any device. Since there are more than 18 million songs in the iTunes Store, most of your music is probably already in iCloud. All you have to upload is what iTunes can’t match. Which is much faster than starting from scratch. And all the music iTunes matches plays back at 256-Kbps iTunes Plus quality — even if your original copy was of lower quality. It costs $24.99 per year. iTunes Match will initially available only in the U.S. and expected to be available in other countries sometime later. Apple was initially expected to launch iTunes Match service along with the launch of iCloud and iOS 5, but has delayed it to fix the outstanding bugs.
==================
Apple Releases iTune 10.5.1 With iTunes Match to the Public

Apple has officially released iTunes 10.5.1 to the public following several developer betas. iTunes Match has been in the final testing stages for months, and beta 3 of the cloud music service was seeded to developers over the weekend.
Alongside iTunes 10.5.1, Apple is finally releasing iTunes Match to the US public today after a two week delay. It’s finally here…
The new iTunes is also available on Apple’s website, and the 10.5.1 is propagating in Software Update for Mac and Windows users. iTunes 10.5.1 is required to use iTunes Match, and iOS 5 users will be able to access their tracks in the cloud once the service is enabled in iTunes

Neither iTunes 10.5.1 nor iTunes Match seem to be available for everyone yet, as Apple is still rolling things out. If you can’t get the new iTunes in Software Update, we recommend downloading it directly from Apple’s website.
iTunes Match is still a US-only service.
More screenshots:


Apple also confirmed the availability of iTunes Match in the U.S., with the following announcement on their iTunes page. iTunes Match syncs users’ music to iCloud for $24.99 a year. Unlimited songs can be synced and doesn’t affect iCloud storage, but only songs that are available on iTunes can be synced.
Even though it is available to the public, Apple is still labeling iTunes Match as a beta product. Developers who tested Match will still receive a free three months with a year subscription.
Wednesday, October 9, 2013
New Netbook The Best At 2012
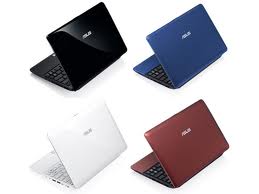
New Netbook The Best At 2012 - Talk of trouble netbook Toshiba, HP, Asus, Dell, Lenovo, Acer has released the latest 2012 version of the netbook products of each course with a distinct advantage. But this time I will only discuss one of the latest netbook product umpteenth 2012 which occupies the top position as the best netbook of 2012.
Good product review photos, specification, prices, advantages, and disadvantages of New Netbook The Best At 2012 this time is of the Asus Eee PC 1015PE. Lets see more details.
Laptop (Netbook) Being a pioneer Asus netbook in 2007, and since then the Eee PC series has grown very large. Eee PC Seashell 1015PE may only have a few additions to the basic concept of a netbook, but its features are unique, the value of a good point, and adequate storage capacity makes it easy to get a recommendation.
Chassis matt black plastic to create the impression of a very impressive high end for a very low price. Although the surface is easy to get dirty because of fingerprints left behind, but also easy to clean. A strong construction quality is also more than tough enough even though they always carry travel.
Largest size in this group, but the weight is not much different from 1.3 kg, so it is still quite thin and portable. With the power of a 6 cell battery, this netbook can be operated up to nearly eight hours. Capabilities are very good although still less than the Acer and Packard Bell in the group.
Asus is also one of the first companies to use isolation keyboard design style (or chiclet) on the netbook. These features are also well implemented on this netbook. The button is smaller than the Acer in the group, but the design is roomy and powerful board that is attached to ensure the activity remains comfortable typing.
Such as Acer, Asus touchpad is also large and wide, comparable to the 10.1 inch screenaspect ratio is too wide. The result, move the cursor on the layer becomes very easy. Single mouse button layered aluminium make this netbook look more cool andcomfortable to use.
Asus rather than the matt TFT screen TFT panel super-shiny. The results reflect bias eliminated completely, making it easier when the netbook is used to working outdoors. Matt TFT screen usually tend to make the image look alive, but we do not see that tradition on this netbook.
Excess
Netbook advantage lies in the extra features it has. In addition to the 250GB hard drive is spacious, Asus also equips with 500GB of online storage, so you can backup data securely over the internet wherever you are. As with other netbooks in the group, a webcam mounted on top of the screen. However, the unique camera is equipped with a slide cover to protect the camera when not in use and more respectful of privacy. Asus also has a typical install ExpressGate software. Finally, the battery lasts up to 13 hours so it is suitable for your choice to the usual wear outside the home.
Shortage
Screen size and resolution are mediocre.
Specification New Netbook The Best At 2012 Asus Eee PC 1015PE
Product Features
- Intel Atom N475 (1.83GHz)
- Intel GMA 3150 design, 1 SODIMM Position, 1GB DDR3 RAM, 2GB Max.
- 0.3MP Web camera , 500GB Free Web Storage space + 250GB SATA Hard Generate (5400RPM).
- 802.11 b/g/n; Wireless 3.0; 10.1-Inch 1024X600 WSVGA Flat Complete LED Display; Chiclet Keyboard
- Windows 7 Starter OS (32 bit); 6 mobile power supply for up to 13 Hours of Battery Life.
Processor, Memory, and Motherboard
- Hardware Platform: PC
- Processor: 1.83 GHz Intel Pentium M
- Number of Processors: 1
- RAM Type: SODIMM
- RAM: 1000 MB
Hard Drive
- Type: Serial ATA
- Size: 250 GB
Cases and Expandability
- Weight: 4.52 pounds
- Size (LWH): 9.96 inches, 2.64 inches, 12.09 inches
Photo New Netbook The Best At 2012 Asus Eee PC 1015PE
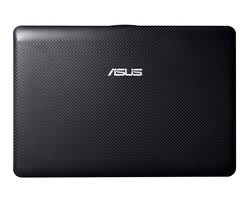

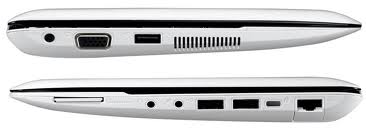
After seeing the full "New Netbook The Best At 2012 Asus Eee PC 1015PE" above if you want to have it? You can get this Netbook the Best 2012 here.
*May Be Useful*
Wednesday, October 2, 2013
Delivering the Windows 8 Release Preview
Windows 8 Release Preview ISO images
Windows 8 Release Preview ISO files (.iso) are provided as an alternative to using Windows 8 Release Preview Setup. If you are on a PC running Windows and want to install the release preview on another partition, another PC, or a virtual machine, we recommend you download Windows 8 Release Preview Setup and use the built-in tools for converting an ISO image into installation media, such as a DVD or USB bootable flash drive. You can find additional information, including a list of supported upgrades, in the FAQ.
Note before you download: Windows 8 Release Preview is prerelease software that may be substantially modified before it’s commercially released. Microsoft makes no warranties, express or implied, with respect to the information provided here. Some product features and functionality may require additional hardware or software.
ISO images
An ISO image must be converted into installation media stored on a DVD or a USB flash drive. Instructions are provided on this page. Developer tools are available for download from Windows Dev Center.
Important: If you decide to go back to your previous operating system, youll need to reinstall it from the recovery or installation media that came with your PC, which is typically DVD media. If you don’t have recovery media, you might be able to create it from a recovery partition on your PC using software provided by your PC manufacturer. Check the support section of your PC manufacturer’s website for more information. After you install Windows 8, you won’t be able to use the recovery partition on your PC to go back to your previous version of Windows.
After you install Windows 8, you won’t be able to use the recovery partition on your PC to go back to your previous version of Windows.
 English
64-bit (x64) Download (3.3 GB) Sha 1 hash — 0xD76AD96773615E8C504F63564AF749469CFCCD57
32-bit (x86) Download (2.5 GB) Sha 1 hash — 0x8BED436F0959E7120A44BF7C29FF0AA962BDEFC9
Product Key: TK8TP-9JN6P-7X7WW-RFFTV-B7QPF
Arabic
64-bit (x64) Download (3.3 GB) Sha 1 hash — 0x0C07A0501840517AE789B4EA82EDE061F4E42CE9
32-bit (x86) Download (2.5 GB) Sha 1 hash — 0x95B8948DB8AF1559B03ADA5A85B7987CFD456544
Product Key: TK8TP-9JN6P-7X7WW-RFFTV-B7QPF
Chinese (Simplified)
64-bit (x64) Download (3.4 GB) Sha 1 hash — 0xC21B69413E08FCFB756EEDB2B99D0C0472486D1C
32-bit (x86) Download (2.6 GB) Sha 1 hash — 0xF9FAF5910275832EA03F630CD5803565C03C8F31
Product Key: TK8TP-9JN6P-7X7WW-RFFTV-B7QPF
Chinese (Traditional)
64-bit (x64) Download (3.4 GB) Sha 1 hash — 0x1556802DEA81A7B3E3159E99F911C1C855B20B24
32-bit (x86) Download (2.6 GB) Sha 1 hash — 0xC617D24A48E5A5A2329CBA5DED2B08EBB7463FD0
Product Key: TK8TP-9JN6P-7X7WW-RFFTV-B7QPF
French
64-bit (x64) Download (3.3 GB) Sha 1 hash — 0x132ED51FAD11EF626BD330288822D68603C5C560
32-bit (x86) Download (2.5 GB) Sha 1 hash — 0x2F434DDD06ADDD38A972E3E71CA059BD9A4416CD
Product Key: TK8TP-9JN6P-7X7WW-RFFTV-B7QPF
German
64-bit (x64) Download (3.3 GB) Sha 1 hash — 0xC0117244B5E018BBF01F6242BF9020D27918A12F
32-bit (x86) Download (2.5 GB) Sha 1 hash — 0x019E239D0990B8C04505F5248DDBD067FC3CAF42
Product Key: TK8TP-9JN6P-7X7WW-RFFTV-B7QPF
Japanese
64-bit (x64) Download (3.3 GB) Sha 1 hash — 0x6393BA8BC2DD3CBD7B55D00B9D9587843BDB05CD
32-bit (x86) Download (2.5 GB) Sha 1 hash — 0xE28666272702351491CCB713DC66E064D88BA994
Product Key: TK8TP-9JN6P-7X7WW-RFFTV-B7QPF
Korean
64-bit (x64) Download (3.3 GB) Sha 1 hash — 0xC4CFD5F2DD54CDC44FCFE5D69122931DEDA57DF6
32-bit (x86) Download (2.5 GB) Sha 1 hash — 0xB605E1428852503C0E7E3490815E96A3101F2C55
Product Key: TK8TP-9JN6P-7X7WW-RFFTV-B7QPF
Portuguese (Brazil)
64-bit (x64) Download (3.3 GB) Sha 1 hash — 0x90B07E56008FAB64AD9CA47F86CC6D99150FBF8A
32-bit (x86) Download (2.5 GB) Sha 1 hash — 0x91AE86FACBBC4D6FAFED0239D15542C28F37827D
Product Key: TK8TP-9JN6P-7X7WW-RFFTV-B7QPF
Russian
64-bit (x64) Download (3.3 GB) Sha 1 hash — 0x10F9F738593BC740561DA8AB247F5CEF3ABA65BB
32-bit (x86) Download (2.5 GB) Sha 1 hash — 0x7A473B0D7F5DB3E949915D2A2F361FAE92A52538
Product Key: TK8TP-9JN6P-7X7WW-RFFTV-B7QPF
Spanish
64-bit (x64) Download (3.3 GB) Sha 1 hash — 0x6E6C4B9D5788BF2BF72E1AC8F1F1D6FA0241311C
32-bit (x86) Download (2.5 GB) Sha 1 hash — 0x533CA552681DFC9F347633F2BA1B5224BEF22EB3
Product Key: TK8TP-9JN6P-7X7WW-RFFTV-B7QPF
Swedish
64-bit (x64) Download (3.3 GB) Sha 1 hash — 0x632DB171AAD356E52930A745D92328055128CB8D
32-bit (x86) Download (2.5 GB) Sha 1 hash — 0x0BBB1EC6F68D4D0DAB0130853B5C6543882ED256
Product Key: TK8TP-9JN6P-7X7WW-RFFTV-B7QPF
Turkish
64-bit (x64) Download (3.3 GB) Sha 1 hash — 0x9086CAA101C872DAB529CA8A01F7C7370986837B
32-bit (x86) Download (2.5 GB) Sha 1 hash — 0x509E6D4331F965BCA4102968016E5AD6B05769BF
Product Key: TK8TP-9JN6P-7X7WW-RFFTV-B7QPF
System Requirements
Windows 8 Release Preview works great on the same hardware that powers Windows 7:
Additional requirements to use certain features:
How to install Windows 8 Release Preview from an ISO image
The easiest way to convert an ISO file to a DVD in Windows 7 is to use Windows Disc Image Burner. On a PC running Windows XP or Windows Vista, a third-party program is required to convert an ISO file into installable media—and DVD burning software often includes this capability. One option is the USB/DVD download tool provided by the Microsoft Store. You can also download Windows 8 Release Preview Setup, which includes tools that allow you to create a DVD or USB flash drive from an ISO file (Windows Vista or Windows 7 required).
Windows 8 Release Preview ISO files (.iso) are provided as an alternative to using Windows 8 Release Preview Setup. If you are on a PC running Windows and want to install the release preview on another partition, another PC, or a virtual machine, we recommend you download Windows 8 Release Preview Setup and use the built-in tools for converting an ISO image into installation media, such as a DVD or USB bootable flash drive. You can find additional information, including a list of supported upgrades, in the FAQ.
Note before you download: Windows 8 Release Preview is prerelease software that may be substantially modified before it’s commercially released. Microsoft makes no warranties, express or implied, with respect to the information provided here. Some product features and functionality may require additional hardware or software.
ISO images
An ISO image must be converted into installation media stored on a DVD or a USB flash drive. Instructions are provided on this page. Developer tools are available for download from Windows Dev Center.
Important: If you decide to go back to your previous operating system, youll need to reinstall it from the recovery or installation media that came with your PC, which is typically DVD media. If you don’t have recovery media, you might be able to create it from a recovery partition on your PC using software provided by your PC manufacturer. Check the support section of your PC manufacturer’s website for more information. After you install Windows 8, you won’t be able to use the recovery partition on your PC to go back to your previous version of Windows.
After you install Windows 8, you won’t be able to use the recovery partition on your PC to go back to your previous version of Windows.
English64-bit (x64) Download (3.3 GB) Sha 1 hash — 0xD76AD96773615E8C504F63564AF749469CFCCD57
32-bit (x86) Download (2.5 GB) Sha 1 hash — 0x8BED436F0959E7120A44BF7C29FF0AA962BDEFC9
Product Key: TK8TP-9JN6P-7X7WW-RFFTV-B7QPF
Arabic64-bit (x64) Download (3.3 GB) Sha 1 hash — 0x0C07A0501840517AE789B4EA82EDE061F4E42CE9
32-bit (x86) Download (2.5 GB) Sha 1 hash — 0x95B8948DB8AF1559B03ADA5A85B7987CFD456544
Product Key: TK8TP-9JN6P-7X7WW-RFFTV-B7QPF
Chinese (Simplified)64-bit (x64) Download (3.4 GB) Sha 1 hash — 0xC21B69413E08FCFB756EEDB2B99D0C0472486D1C
32-bit (x86) Download (2.6 GB) Sha 1 hash — 0xF9FAF5910275832EA03F630CD5803565C03C8F31
Product Key: TK8TP-9JN6P-7X7WW-RFFTV-B7QPF
Chinese (Traditional)64-bit (x64) Download (3.4 GB) Sha 1 hash — 0x1556802DEA81A7B3E3159E99F911C1C855B20B24
32-bit (x86) Download (2.6 GB) Sha 1 hash — 0xC617D24A48E5A5A2329CBA5DED2B08EBB7463FD0
Product Key: TK8TP-9JN6P-7X7WW-RFFTV-B7QPF
French64-bit (x64) Download (3.3 GB) Sha 1 hash — 0x132ED51FAD11EF626BD330288822D68603C5C560
32-bit (x86) Download (2.5 GB) Sha 1 hash — 0x2F434DDD06ADDD38A972E3E71CA059BD9A4416CD
Product Key: TK8TP-9JN6P-7X7WW-RFFTV-B7QPF
German64-bit (x64) Download (3.3 GB) Sha 1 hash — 0xC0117244B5E018BBF01F6242BF9020D27918A12F
32-bit (x86) Download (2.5 GB) Sha 1 hash — 0x019E239D0990B8C04505F5248DDBD067FC3CAF42
Product Key: TK8TP-9JN6P-7X7WW-RFFTV-B7QPF
Japanese64-bit (x64) Download (3.3 GB) Sha 1 hash — 0x6393BA8BC2DD3CBD7B55D00B9D9587843BDB05CD
32-bit (x86) Download (2.5 GB) Sha 1 hash — 0xE28666272702351491CCB713DC66E064D88BA994
Product Key: TK8TP-9JN6P-7X7WW-RFFTV-B7QPF
Korean64-bit (x64) Download (3.3 GB) Sha 1 hash — 0xC4CFD5F2DD54CDC44FCFE5D69122931DEDA57DF6
32-bit (x86) Download (2.5 GB) Sha 1 hash — 0xB605E1428852503C0E7E3490815E96A3101F2C55
Product Key: TK8TP-9JN6P-7X7WW-RFFTV-B7QPF
Portuguese (Brazil)64-bit (x64) Download (3.3 GB) Sha 1 hash — 0x90B07E56008FAB64AD9CA47F86CC6D99150FBF8A
32-bit (x86) Download (2.5 GB) Sha 1 hash — 0x91AE86FACBBC4D6FAFED0239D15542C28F37827D
Product Key: TK8TP-9JN6P-7X7WW-RFFTV-B7QPF
Russian64-bit (x64) Download (3.3 GB) Sha 1 hash — 0x10F9F738593BC740561DA8AB247F5CEF3ABA65BB
32-bit (x86) Download (2.5 GB) Sha 1 hash — 0x7A473B0D7F5DB3E949915D2A2F361FAE92A52538
Product Key: TK8TP-9JN6P-7X7WW-RFFTV-B7QPF
Spanish64-bit (x64) Download (3.3 GB) Sha 1 hash — 0x6E6C4B9D5788BF2BF72E1AC8F1F1D6FA0241311C
32-bit (x86) Download (2.5 GB) Sha 1 hash — 0x533CA552681DFC9F347633F2BA1B5224BEF22EB3
Product Key: TK8TP-9JN6P-7X7WW-RFFTV-B7QPF
Swedish64-bit (x64) Download (3.3 GB) Sha 1 hash — 0x632DB171AAD356E52930A745D92328055128CB8D
32-bit (x86) Download (2.5 GB) Sha 1 hash — 0x0BBB1EC6F68D4D0DAB0130853B5C6543882ED256
Product Key: TK8TP-9JN6P-7X7WW-RFFTV-B7QPF
Turkish64-bit (x64) Download (3.3 GB) Sha 1 hash — 0x9086CAA101C872DAB529CA8A01F7C7370986837B
32-bit (x86) Download (2.5 GB) Sha 1 hash — 0x509E6D4331F965BCA4102968016E5AD6B05769BF
Product Key: TK8TP-9JN6P-7X7WW-RFFTV-B7QPF
System Requirements
Windows 8 Release Preview works great on the same hardware that powers Windows 7:
- Processor: 1 gigahertz (GHz) or faster
- RAM: 1 gigabyte (GB) (32-bit) or 2 GB (64-bit)
- Hard disk space: 16 GB (32-bit) or 20 GB (64-bit)
- Graphics card: Microsoft DirectX 9 graphics device with WDDM driver
Additional requirements to use certain features:
- To use touch, you need a tablet or a monitor that supports multitouch.
- To access the Windows Store and to download and run apps, you need an active Internet connection and a screen resolution of at least 1024 x 768.
- To snap apps, you need a screen resolution of at least 1366 x 768.
- Internet access (ISP fees might apply)
How to install Windows 8 Release Preview from an ISO image
The easiest way to convert an ISO file to a DVD in Windows 7 is to use Windows Disc Image Burner. On a PC running Windows XP or Windows Vista, a third-party program is required to convert an ISO file into installable media—and DVD burning software often includes this capability. One option is the USB/DVD download tool provided by the Microsoft Store. You can also download Windows 8 Release Preview Setup, which includes tools that allow you to create a DVD or USB flash drive from an ISO file (Windows Vista or Windows 7 required).
Siri Ported To The iPhone 3GS video

After successfully porting Siri to the iPhone 4 and iPod Touch 4G, the dynamic duo chpwn and Steve Troughton-Smith, managed to port iPhone’s personal assistant to the 3GS. There’s no word on when or if it will be released to the public. In theory, the distribution of Siri is illegal , but there might be a workaround it….
Check out the video after the break…
Saturday, September 28, 2013
Update Install Siri Proxy It’s illegal Don’t believe all the hype
HOW TO: Install Siri Proxy

A couple of weeks ago, plamoni’s has released Siri Proxy and we’ve seen quite a few plugins that will extend our Siri experience. Today, we’re going to show you how to install Siri Proxy so you can take advantage of all these plugins. Head over the break to start…
NOTE: major duh moment – this is for iPhone 4S. Siri was fully ported to *older* devices, but NOT being distributed. It’s illegal. Don’t believe all the hype.
1. Download Siri Proxy
2. Download and install Mac Ports
3 Open Terminal and type : sudo port install dnsmasq . Type in your computer’s password


4. Type bash < <(curl -s https://raw.github.com/wayneeseguin/.../rvm-installer) to download/install RVM

5. Type [[ -s "$HOME/.rvm/scripts/rvm" ]] && . “$HOME/.rvm/scripts/rvm” to activate RVM
 6. Type echo ‘[[ -s "$HOME/.rvm/scripts/rvm" ]] && . “$HOME/.rvm/scripts/rvm” # Load RVM function’ >> ~/.bash_profile to add RVM to your .bash_profile
7. Type rvm install 1.9.3 to install Ruby 1.9.3
8. Some users might get an error while installing Ruby. This only applies to *some* Lion users.
 9. If you get this error, type rvm install 1.9.3 –with-gcc=clang

10. Type rvm use 1.9.3 –default to set RVM to use/default to 1.9.3
11. Now you need to cd into the the siri proxy folder you downloaded at step 1 ( make sure you unzipped it first ). The easiest way is to type cd and then just drag-and-drop the folder from your desktop ( or downloads location – whatever it may be ) to your terminal shell.

12. Type rvmsudo gem install rake bundler to install Rake and Bundler. Type in your computer password
13. Type rake install to Install SiriProxy gem
14. Type mkdir ~/.siriproxy to make .siriproxy directory
15. Type cp ./config.example.yml ~/.siriproxy/config.yml to move default config file to .siriproxy
16. Type sudo port install openssl
17. Type ./siriproxy gencerts to generate certificates
18. Next you need to install ca.pem onto your iPhone. To do that open a finder window, press cmd+shift+G and enter the following path ~/.siriproxy

19. Email ca.pem to yourself

20. On your phone you will see the new file. Tap on it and install it.

21. Search your Mac for this file: dnsmasq.conf. Once you’ve found it, open it in a texteditor ( we suggest TextWrangler – free ). Inside the file find #address=double-click.net/127.0.0.1 ( line 62 ). Right below that, add the following line: address=/guzzoni.apple.com/your-computer-IP
 21.1 Type in terminal sudo dnsmasq . Check activity monitor if dnsmasq is running ( all processes )
22. On your iPhone, open Settings.app. Go to WiFi, select your WiFi, and edit your DNS. Should be something like 10.0.1.0. You need to change the last 0 into a 3. ( i.e 10.0.1.3 )

23. Now you need to cd into the bin folder found in the plamoni-SiriProxy-fe75db4 you downloaded at step 1. To do that type cd and drag-and-drop the bin folder into the terminal
24. Type ./siriproxy bundle

25. Type rvmsudo siriproxy server and type your password.

26. Now everything should be up and running. To test it, fire up Siri and say ‘Test Siri Proxy’

27. Now the fun part. All the plugins that makes Siri Proxy magic. We will show you where to get plugins and how to install them in the next
=======================
HOW TO: Install Siri Proxy Plugins
In a nutshell, Siri Proxy is retarded. There’s so much potential here, and devs all over the world have already created amazing plugins for it. In our previous post, we showed you how to install Siri Proxy, now let’s see how to install plugins for it.
1. Go to plamoni’s github and check out the available plugins. Most of them come with a video demo so you know how to use them.
2. Download any plugin that you want/need. For this tutorial we’re going to use the twitter plugin.
3. Download the plugin and unzip it.
4. Rename the folder to siriproxy-twitter

5. Copy siriproxy-twitter to /…/plamoni-SiriProxy-fe75db4/plugins/

6. Open a Finder window, hit cmd+shift+G and browse to the following path ~/.siriproxy
7. Open config.yml in TextEdit
8. Now here’s where it gets tricky. First you need to duplicate the given example

8.1 Now edit the duplicated lines according to your plugin. In this case, the Twitter plugin should look like
9. Open Terminal
10. Now you need to cd into the bin folder found in the plamoni-SiriProxy-fe75db4. To do that type cd and drag-and-drop the bin folder into the terminal

11. Type ./siriproxy bundle . You need to do this every time you change plugin configurations to update required gems.
12. Type rvmsudo /.siriproxy server and type your password.
13. Now, fire up Siri and say Tweet followed by whatever you want to tweet.

NOTE: this plugin won’t let you tweet until you go to twitter.com/apps and get the oauth credentials and put them in config.yml. This tutorial shows you how to install a plugin, not use a plugin to tweet using Siri. Just saying…

A couple of weeks ago, plamoni’s has released Siri Proxy and we’ve seen quite a few plugins that will extend our Siri experience. Today, we’re going to show you how to install Siri Proxy so you can take advantage of all these plugins. Head over the break to start…
NOTE: major duh moment – this is for iPhone 4S. Siri was fully ported to *older* devices, but NOT being distributed. It’s illegal. Don’t believe all the hype.
1. Download Siri Proxy
2. Download and install Mac Ports
3 Open Terminal and type : sudo port install dnsmasq . Type in your computer’s password


4. Type bash < <(curl -s https://raw.github.com/wayneeseguin/.../rvm-installer) to download/install RVM

5. Type [[ -s "$HOME/.rvm/scripts/rvm" ]] && . “$HOME/.rvm/scripts/rvm” to activate RVM
 6. Type echo ‘[[ -s "$HOME/.rvm/scripts/rvm" ]] && . “$HOME/.rvm/scripts/rvm” # Load RVM function’ >> ~/.bash_profile to add RVM to your .bash_profile
7. Type rvm install 1.9.3 to install Ruby 1.9.3
8. Some users might get an error while installing Ruby. This only applies to *some* Lion users.
 9. If you get this error, type rvm install 1.9.3 –with-gcc=clang
10. Type rvm use 1.9.3 –default to set RVM to use/default to 1.9.3
11. Now you need to cd into the the siri proxy folder you downloaded at step 1 ( make sure you unzipped it first ). The easiest way is to type cd and then just drag-and-drop the folder from your desktop ( or downloads location – whatever it may be ) to your terminal shell.

12. Type rvmsudo gem install rake bundler to install Rake and Bundler. Type in your computer password
13. Type rake install to Install SiriProxy gem
14. Type mkdir ~/.siriproxy to make .siriproxy directory
15. Type cp ./config.example.yml ~/.siriproxy/config.yml to move default config file to .siriproxy
16. Type sudo port install openssl
17. Type ./siriproxy gencerts to generate certificates
18. Next you need to install ca.pem onto your iPhone. To do that open a finder window, press cmd+shift+G and enter the following path ~/.siriproxy

19. Email ca.pem to yourself

20. On your phone you will see the new file. Tap on it and install it.

21. Search your Mac for this file: dnsmasq.conf. Once you’ve found it, open it in a texteditor ( we suggest TextWrangler – free ). Inside the file find #address=double-click.net/127.0.0.1 ( line 62 ). Right below that, add the following line: address=/guzzoni.apple.com/your-computer-IP
 21.1 Type in terminal sudo dnsmasq . Check activity monitor if dnsmasq is running ( all processes )
22. On your iPhone, open Settings.app. Go to WiFi, select your WiFi, and edit your DNS. Should be something like 10.0.1.0. You need to change the last 0 into a 3. ( i.e 10.0.1.3 )

23. Now you need to cd into the bin folder found in the plamoni-SiriProxy-fe75db4 you downloaded at step 1. To do that type cd and drag-and-drop the bin folder into the terminal
24. Type ./siriproxy bundle

25. Type rvmsudo siriproxy server and type your password.

26. Now everything should be up and running. To test it, fire up Siri and say ‘Test Siri Proxy’

27. Now the fun part. All the plugins that makes Siri Proxy magic. We will show you where to get plugins and how to install them in the next
=======================
HOW TO: Install Siri Proxy Plugins
In a nutshell, Siri Proxy is retarded. There’s so much potential here, and devs all over the world have already created amazing plugins for it. In our previous post, we showed you how to install Siri Proxy, now let’s see how to install plugins for it.
1. Go to plamoni’s github and check out the available plugins. Most of them come with a video demo so you know how to use them.
2. Download any plugin that you want/need. For this tutorial we’re going to use the twitter plugin.
3. Download the plugin and unzip it.
4. Rename the folder to siriproxy-twitter

5. Copy siriproxy-twitter to /…/plamoni-SiriProxy-fe75db4/plugins/

6. Open a Finder window, hit cmd+shift+G and browse to the following path ~/.siriproxy
7. Open config.yml in TextEdit
8. Now here’s where it gets tricky. First you need to duplicate the given example
- name: ‘Example’
path: ‘./plugins/siriproxy-example’
path: ‘./plugins/siriproxy-example’

8.1 Now edit the duplicated lines according to your plugin. In this case, the Twitter plugin should look like
- name: ‘Twitter’
path: ‘./plugins/siriproxy-twitter’
Before saving the file, MAKE SURE the newly added lines are perfectly aligned with the example above. If you fail this step, you will get a bunch of errors.path: ‘./plugins/siriproxy-twitter’
9. Open Terminal
10. Now you need to cd into the bin folder found in the plamoni-SiriProxy-fe75db4. To do that type cd and drag-and-drop the bin folder into the terminal

11. Type ./siriproxy bundle . You need to do this every time you change plugin configurations to update required gems.
12. Type rvmsudo /.siriproxy server and type your password.
13. Now, fire up Siri and say Tweet followed by whatever you want to tweet.

NOTE: this plugin won’t let you tweet until you go to twitter.com/apps and get the oauth credentials and put them in config.yml. This tutorial shows you how to install a plugin, not use a plugin to tweet using Siri. Just saying…
Subscribe to:
Posts (Atom)