Showing posts with label error. Show all posts
Showing posts with label error. Show all posts
Monday, October 7, 2013
Fix iTunes 3194 error when downgrading 5 0 1 to 4 3 3 4 3 5 using TinyUmbrella
How to fix iTunes 3194 error when downgrading from 5.0.1 to 4.3.3 / 4.3.5 or what ever iOS version? We will show you how tweak Hosts file in order to bypass iTunes 3194 when downgrading iPhone? Here is a 2 step guide that is going to help you do this!

For Windows:
Step 1 : Open Notepad or any text editing tool. After that , launch windows explorer or press Windows + E , navigate to C:WindowsSystem32driversetc and then in ETC directory open the HOSTS file with Notepad.
Step 2 : Add "74.208.10.249 gs.apple.com" at the last of HOSTS file and then save it.
For Mac :
Step 1 : Open Go -> Go to Folder and then enter path/etc
Step 2 : Launch HOSTS file via TextEdit or any text editing tools and add "74.208.10.249 gs.apple.com" at the last of the file
Then follow this guide to downgrade your iPhone from iOS 5.0.1 using TinyUmbrella. Note that some iPhone jailbreakers who downgrade their devices from iOS 5 back to a lower version experience "No service issue". It is recommended to restore the iPhone back to iOS 5 if this error shows and then jailbreak it using RedsnOw 0.9.9b8 as theres a no fix for this error at the moment.
For Windows:
Step 1 : Open Notepad or any text editing tool. After that , launch windows explorer or press Windows + E , navigate to C:WindowsSystem32driversetc and then in ETC directory open the HOSTS file with Notepad.
Step 2 : Add "74.208.10.249 gs.apple.com" at the last of HOSTS file and then save it.
For Mac :
Step 1 : Open Go -> Go to Folder and then enter path/etc
Step 2 : Launch HOSTS file via TextEdit or any text editing tools and add "74.208.10.249 gs.apple.com" at the last of the file
Then follow this guide to downgrade your iPhone from iOS 5.0.1 using TinyUmbrella. Note that some iPhone jailbreakers who downgrade their devices from iOS 5 back to a lower version experience "No service issue". It is recommended to restore the iPhone back to iOS 5 if this error shows and then jailbreak it using RedsnOw 0.9.9b8 as theres a no fix for this error at the moment.

Fix iTunes Error 3001 42110 5103 When Downloading Movie
When you try to download movie rental from the iTunes Store you may experience an error message 3001, 42110, or 5103 .We will try to give you the trusted solution to these errors . We wish that would help all iOS devices users when experiencing these errors.
For Mac OS X :
1-Quit iTunes and any other open applications so only the Finder is open.
2-Click Go > Go to Folder.
3-Type /Users/Shared/SC Info and click Go.
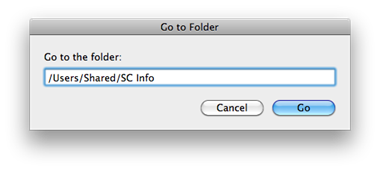
4-If Finder is not set to column view you can set it by choosing View > as Columns.
5-Select the SC Info folder and move it to the Trash by choosing File > Move to Trash.
6-Open iTunes and choose Store > Check for available downloads.
7-After your rental finishes downloading, choose Store > Authorize.
8-Enter your account name and password, then click the Authorize button.
For windows xp :
1-Open My Computer from the desktop or Start Menu.
2-From the Tools menu, choose Folder Options
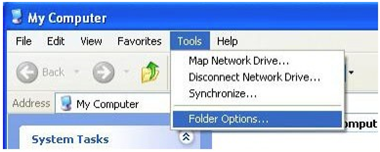
3-Click View tab.
4-In the "Advanced settings" pane under "Hidden files and folders," make sure that the "Show hidden files and folders" option is selected.
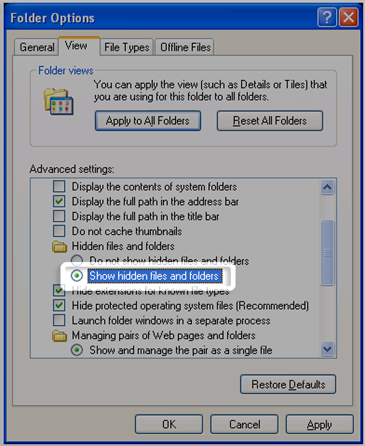
5-Click OK.
6-Navigate to the following location by either typing it into the address bar, copying and pasting it into the address bar, or clicking through the folder hierarchy listed:
C:Documents and SettingsAll UsersApplication DataApple ComputeriTunes
7-Right-click the SC Info folder shown and on the shortcut menu, choose Delete.
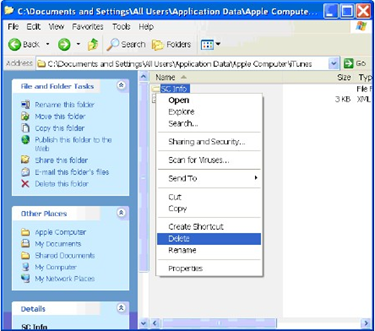
8-Restart the computer.
9-Open iTunes and choose Store > Check for available downloads.
10-After your rental finishes downloading, choose Store > Authorize.
11-Enter your account name and password, then click the Authorize button.
For windows 7 & vista :
1-From the Start menu, choose Computer.
2-From the Organize menu, choose Folder and Search Options.
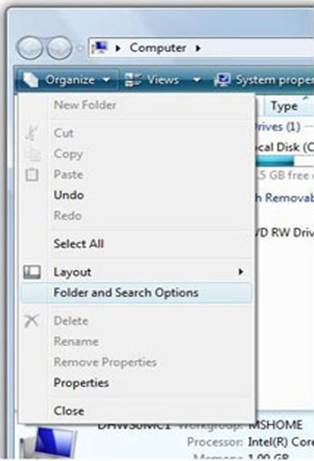
3-Click View tab.
4-In the "Advanced settings" pane under "Hidden files and folders," make sure that the "Show hidden files and folders" option is selected.
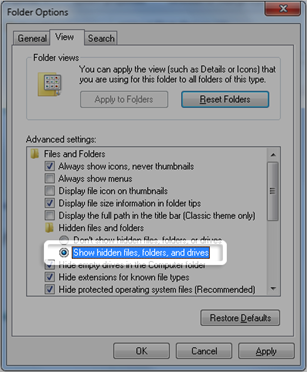
5-Click OK.
6-Navigate to the following location by either typing it into the address bar, copying and pasting it into the address bar, or clicking through the folder hierarchy listed:
C:Documents and SettingsAll UsersApplication DataApple ComputeriTunes
7-Right-click the SC Info folder shown and on the shortcut menu, choose Delete.
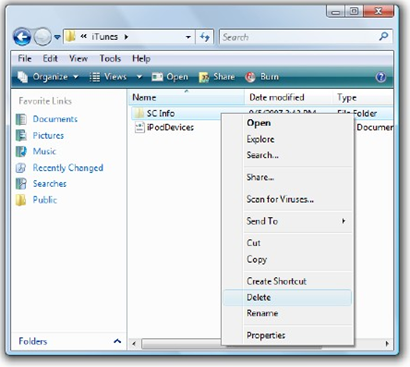
8-Restart the computer.
9-Open iTunes and choose Store > Check for available downloads.
10-After your rental finishes downloading, choose Store > Authorize.
11-Enter your account name and password, then click the Authorize button.
How Fix iTunes Error 3001, 42110, 5103 :
If you have the most recent version and are still unable to download your rental, you may be able to resolve your issue by removing the "SC Info" folder. To do so, follow these steps:For Mac OS X :
1-Quit iTunes and any other open applications so only the Finder is open.
2-Click Go > Go to Folder.
3-Type /Users/Shared/SC Info and click Go.

4-If Finder is not set to column view you can set it by choosing View > as Columns.
5-Select the SC Info folder and move it to the Trash by choosing File > Move to Trash.
6-Open iTunes and choose Store > Check for available downloads.
7-After your rental finishes downloading, choose Store > Authorize.
8-Enter your account name and password, then click the Authorize button.
For windows xp :
1-Open My Computer from the desktop or Start Menu.
2-From the Tools menu, choose Folder Options

3-Click View tab.
4-In the "Advanced settings" pane under "Hidden files and folders," make sure that the "Show hidden files and folders" option is selected.

5-Click OK.
6-Navigate to the following location by either typing it into the address bar, copying and pasting it into the address bar, or clicking through the folder hierarchy listed:
C:Documents and SettingsAll UsersApplication DataApple ComputeriTunes
7-Right-click the SC Info folder shown and on the shortcut menu, choose Delete.

8-Restart the computer.
9-Open iTunes and choose Store > Check for available downloads.
10-After your rental finishes downloading, choose Store > Authorize.
11-Enter your account name and password, then click the Authorize button.
For windows 7 & vista :
1-From the Start menu, choose Computer.
2-From the Organize menu, choose Folder and Search Options.

3-Click View tab.
4-In the "Advanced settings" pane under "Hidden files and folders," make sure that the "Show hidden files and folders" option is selected.

5-Click OK.
6-Navigate to the following location by either typing it into the address bar, copying and pasting it into the address bar, or clicking through the folder hierarchy listed:
C:Documents and SettingsAll UsersApplication DataApple ComputeriTunes
7-Right-click the SC Info folder shown and on the shortcut menu, choose Delete.

8-Restart the computer.
9-Open iTunes and choose Store > Check for available downloads.
10-After your rental finishes downloading, choose Store > Authorize.
11-Enter your account name and password, then click the Authorize button.
Sunday, September 29, 2013
iREB RC4 Available for Download Fixes 1604 1603 1602 1601 1600 Error
iH8sn0w, the well-known iPhone hacker has announced the release of iREB RC4. This is the new updated version of iREB which bypasses 1604, 1603, 1602, 1601, 1600 errors in iTunes. Now you can use this app on both iOS 3.x and iOS 4.x.
For your kind information using iREB you can load custom firmware on your iOS device by putting it in a pwned DFU state. Also you can use this app to kick your iOS device out of recovery mode.
Download iREB RC4 for Windows.

Thursday, September 26, 2013
How to Fix Installous API Error Video
How to fix Installous API Error ? This is one of the most common errors for who used Installous on iPhone 4, 3GS, iPod Touch 4G, 3G, iPad 2 and iPad 1. They getting this message "API Error API unavailable" or "API Error API Permission Denied" when downloading apps from Installous. If you are on of them, dont worry. I will show you how to fix Installous API Error after the jump.

Well, Installous API Error is occurred due to issues with AppSync compatibility. So our guide will show you how to fix Installous API Error by uninstalling and re-installing AppSync with few simple steps.
Step 1: Uninstall AppSync. Open Cydia > Manage > Packages, then open AppSync , Modify > Remove > Confirm.
Step 2: Reboot your device
Step 3: Install AppSync. Open Cydia > Sources > Hackulo.us then install AppSync. (You can get it from Cydia Search too)
Step 4: Install Installous. Open Cydia > Sources > Hackulo.us then install Installous (You can get it from Cydia Search too)
Step 5: Open the real App Store and install any free app.
Step 6: Open Installous and start installing apps without API error. Enjoy
What does Installous API Error mean ?
Well, Installous API Error is occurred due to issues with AppSync compatibility. So our guide will show you how to fix Installous API Error by uninstalling and re-installing AppSync with few simple steps.
How to fix Installous API Error [Tutorial]
Step 1: Uninstall AppSync. Open Cydia > Manage > Packages, then open AppSync , Modify > Remove > Confirm.
Step 2: Reboot your device
Step 3: Install AppSync. Open Cydia > Sources > Hackulo.us then install AppSync. (You can get it from Cydia Search too)
Step 4: Install Installous. Open Cydia > Sources > Hackulo.us then install Installous (You can get it from Cydia Search too)
Step 5: Open the real App Store and install any free app.
Step 6: Open Installous and start installing apps without API error. Enjoy
How to Fix Installous API Error [Video Tutorial]
Now you have successfully fixed Installous API error ;).
Tuesday, September 24, 2013
Fix iTunes Error 21 when restore Custom IPSW iPhone iPod Touch iPad
How to Fix iTunes error 21 ? Well, error 21 is happening with users who are trying to jailbreak their iPhone 4, 3GS, iPod touch 4G, 3G or iPad using custom ipsw (per-jailbroken ipsw firmware) with PwnageTool or sn0wbreeze which are the only jailbreak tools that make custom ipsw.
What does iTunes error 21 mean ?
When you found iTunes error 21, it means that you are attempting to restore custom ipsw in the recovery mode.
How to Fix iTunes error 21 ?
To fix iTunes error 21 on iPhone 4, 3GS, iPod Touch 4G, 3G or iPad you have to restore to custom ipsw when your device in the DFU mode (Device Firmware Upgrade).
Steps to put your device in DFU mode to Fix iTunes error 21:
Step 1: Connect your iPhone to your Mac/PC and press power button for few seconds. You will be asked to slide to power off. Slick it to power off your iPhone.
Step 2: Now Press and hold Home button and the Sleep/Wake button at the same time.
Step 3: After 10 seconds release the Sleep/Wake button but keep holding the home button until iTunes pops up with a message telling you that it has detected an iPhone in recovery mode.Step 4: Once you are in DFU mode you wont see anything on you screen. It will be BLACK.
Now you have fixed iTunes error 21, go now and restore to custom ipsw firmware without errors


Monday, September 23, 2013
Fix Error 1611 iPhone 4 3GS iPod touch 4G 3G iPad When Restore 4 3 5 to 4 3 3
Error 1611 is on of the common errors that faces users while restoring their iPhone 4, 3GS, iPod touch 4G, 3G, iPad. When you get error 1611, iTunes shows this message “The iPhone "your device name" could not be restored. An unknown error has occurred (error 1611)". Lets check out how to fix 1611 error after the jump.

Method 1: Reboot your computer and change the USB port.
Method 2: check out the below video guide to fix 1611 error.
How to Fix Error 1611 iPhone 4, 3GS, iPod touch 4G, 3G, iPad 2, 1 after restore 4.3.5 to 4.3.3 :
Error 1611 can be fixed by one of the following trials, so you have to try "method 1", if you still have error 1611 try "method 2" :Method 1: Reboot your computer and change the USB port.
Method 2: check out the below video guide to fix 1611 error.
Saturday, September 7, 2013
Fix iTunes Error 1603 When Restoring iPhone in iTunes
Want to Fix iTunes Error 1603 ? Well, you may see this iTunes error 1603 when you trying to restore your iPhone in iTunes. Error 1603 gives you the following error message "The iPhone could not be restored. An unknown error occurred. Error 1603". Lets check how to fix iTunes error 1603 after the jump.
How to fix iTunes error 1603 :
Below I will show you some tips that help you to fix iTunes error 1603 :
Tip 1: Check for iTunes updates :Tip 2: Restart your Computer
- Windows: Choose Help > Check for Updates.
- Mac: Choose iTunes > Check for Updates.
- Restart your computer may help to fix iTunes error 1603
Tip 3: Try different USP PortTip 4: Restart Apple Mobile Device Service (Windows Only) :
- Try to connect your iPhone with computer via another USB port, then try to restore using iTunes.
Restoring Apple mobile device service on Windows XP or Windows Vista / 7 may help you to fix iTunes error 1603 while restoring your iPhone.
Windows XPWindows Vista
- Close iTunes and disconnect iPhone.
- Choose Start > Control Panel.
- Inside the Control Panel, open Administrative Tools.
- Open Services.
- Select Apple Mobile Device and click Stop the service as shown below:
- After the service is stopped, click Start the service.
- After the Apple Mobile Device service has started again, open iTunes and connect iPhone.
- Select iPhone in the Source list, click the Summary tab, and then click Restore.
Tip 5: Reset the iPhone sync history and restore on Windows and Mac - How to do this ?
- Close iTunes and disconnect iPhone.
- Click the Windows Start button
- In the Start Search field type "Services."
- In the Programs section of the search results, Click "Services".
- Select Apple Mobile Device and click Stop the service as shown below:
- After the service is stopped, click Start the service.
- After the Apple Mobile Device service has started again, open iTunes and connect iPhone.
- Select iPhone in the Source list, click the Summary tab, and then click Restore.
WindowsMac
- Open iTunes
- On the Edit menu, click Preferences.
- Click the iPhone tab.
- Click the Reset Sync History button.
Tip 6: Create a new user account - How to do this ?
- Open iSync.
- Choose iSync > Preferences.
- Click the Reset Sync History button.
Windows Vista and Windows XPMac OS X
- From the Start menu, choose Control Panel.
- Open User Accounts.
- Select Create a new account and follow the instructions to complete the account setup process.
- Once the new account is created, choose Log Off from the Start menu.
- Log in to the newly created user account.
If you the above tips didnt work with you and fixed iTunes error 1603 you have to download iReb - Click Here - as it will help you to bypass iTunes error 1603.
- Choose Apple menu > System Preferences.
- Choose View > Accounts.
- Click the "+" (you may need to authenticate to be able to click this).
- Give the new user a name and short name and enter a password.
- Select the checkbox for "Allow user to administer this computer". This makes the user an administrator user.
- Click Create Account.


Subscribe to:
Posts (Atom)